# Step 5: Connect HubSpot Form with Surface Workflow
Configure **Surface** to send form submissions to the **same HubSpot form** you created in [Step 1](https://www.withsurface.com/docs/guides/email-sequences-hubspot/step-1-hubspot-form). When a lead submits or drops off your Surface form, Surface creates a form response in HubSpot, which triggers the automation from [Step 4](https://www.withsurface.com/docs/guides/email-sequences-hubspot/step-4-automation) and enrolls them in your sequence.
For more detail and alternative setups, see the full guide [Configure HubSpot in Surface Workflow](https://www.withsurface.com/docs/guides/hubspot-forms/configure-workflow).
## Connect HubSpot to Surface [#connect-hubspot-to-surface]
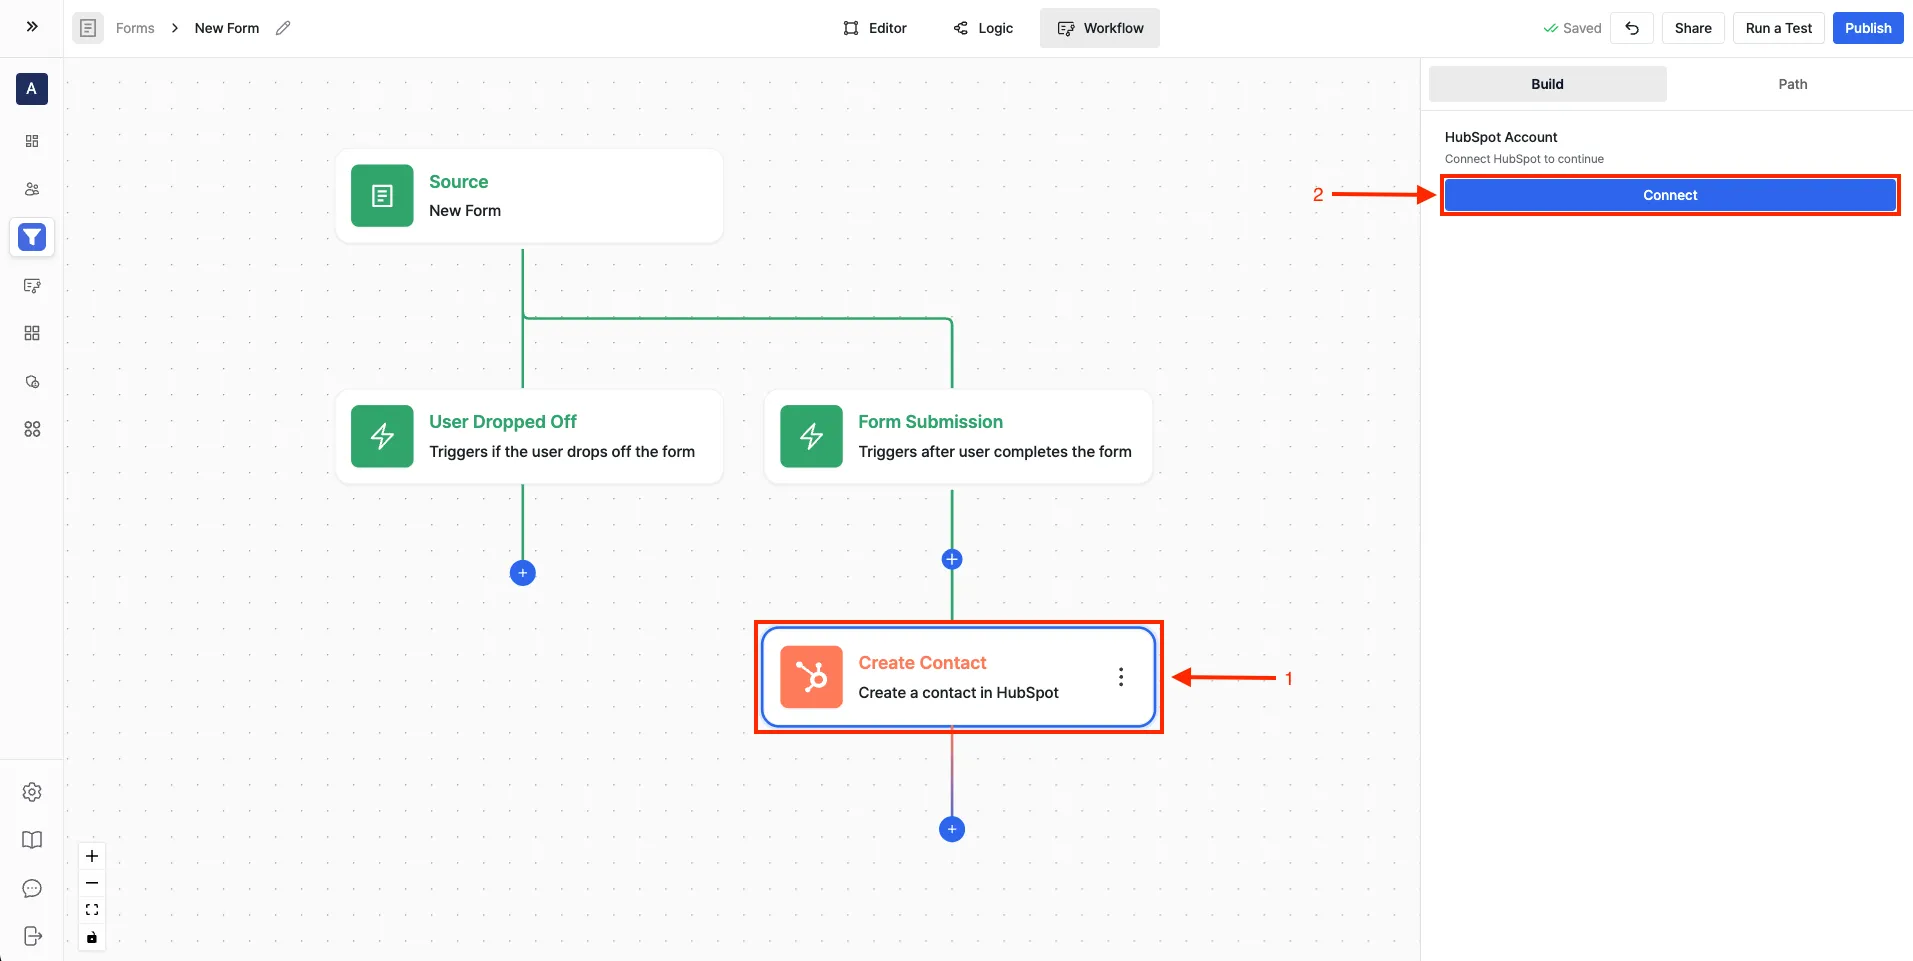 1. Navigate to the **Workflow Builder** in Surface
2. Add any HubSpot action and click **Connect**
3. Select your HubSpot organization when prompted
4. Accept Surface Labs invite
5. Click **Connect App** to complete setup
## Create a Workflow [#create-a-workflow]
1. Go to **Workflow Builder** from the sidebar
2. Click **Create workflow**
3. Choose trigger type:
* **Dropped Off**: For partial submissions (lead leaves before completing the form). Use this so drop-offs still get enrolled in your sequence.
* **Finished**: For complete submissions only (lead submits the full form)
Add one or both triggers depending on whether you want to enroll partial submissions, completed submissions, or both.
1. Navigate to the **Workflow Builder** in Surface
2. Add any HubSpot action and click **Connect**
3. Select your HubSpot organization when prompted
4. Accept Surface Labs invite
5. Click **Connect App** to complete setup
## Create a Workflow [#create-a-workflow]
1. Go to **Workflow Builder** from the sidebar
2. Click **Create workflow**
3. Choose trigger type:
* **Dropped Off**: For partial submissions (lead leaves before completing the form). Use this so drop-offs still get enrolled in your sequence.
* **Finished**: For complete submissions only (lead submits the full form)
Add one or both triggers depending on whether you want to enroll partial submissions, completed submissions, or both.
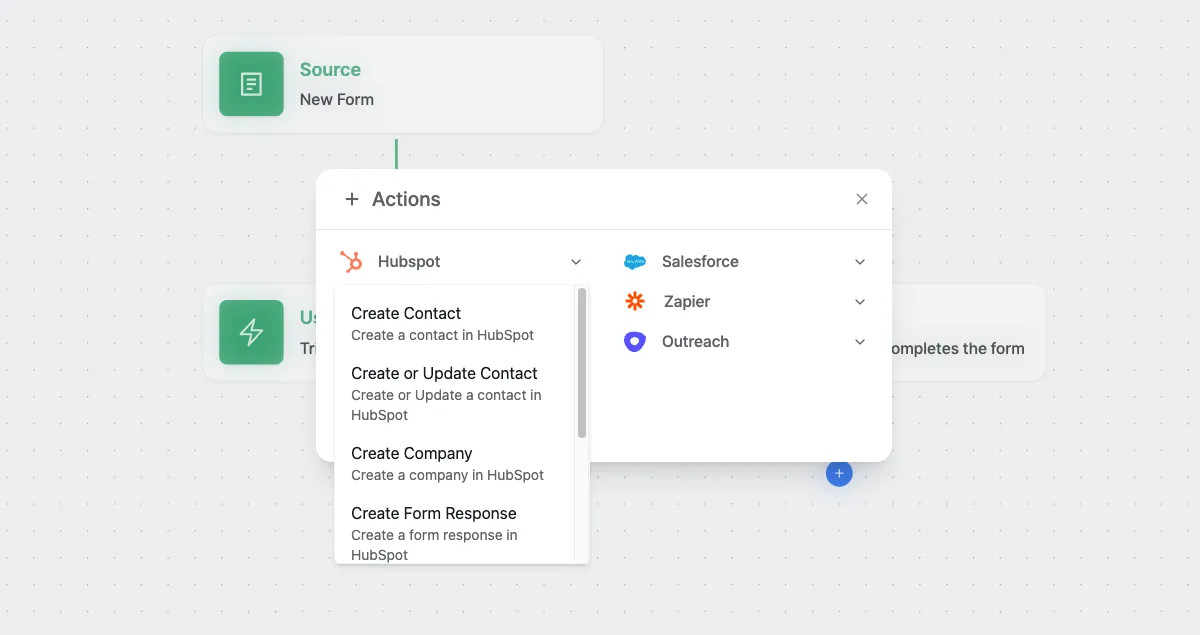 ## Add HubSpot Action [#add-hubspot-action]
1. Click **+ Actions**
2. Select **HubSpot** from the actions list
3. Choose **Create Form Response** action
## Configure Form Response Action [#configure-form-response-action]
### Select Your HubSpot Form [#select-your-hubspot-form]
## Add HubSpot Action [#add-hubspot-action]
1. Click **+ Actions**
2. Select **HubSpot** from the actions list
3. Choose **Create Form Response** action
## Configure Form Response Action [#configure-form-response-action]
### Select Your HubSpot Form [#select-your-hubspot-form]
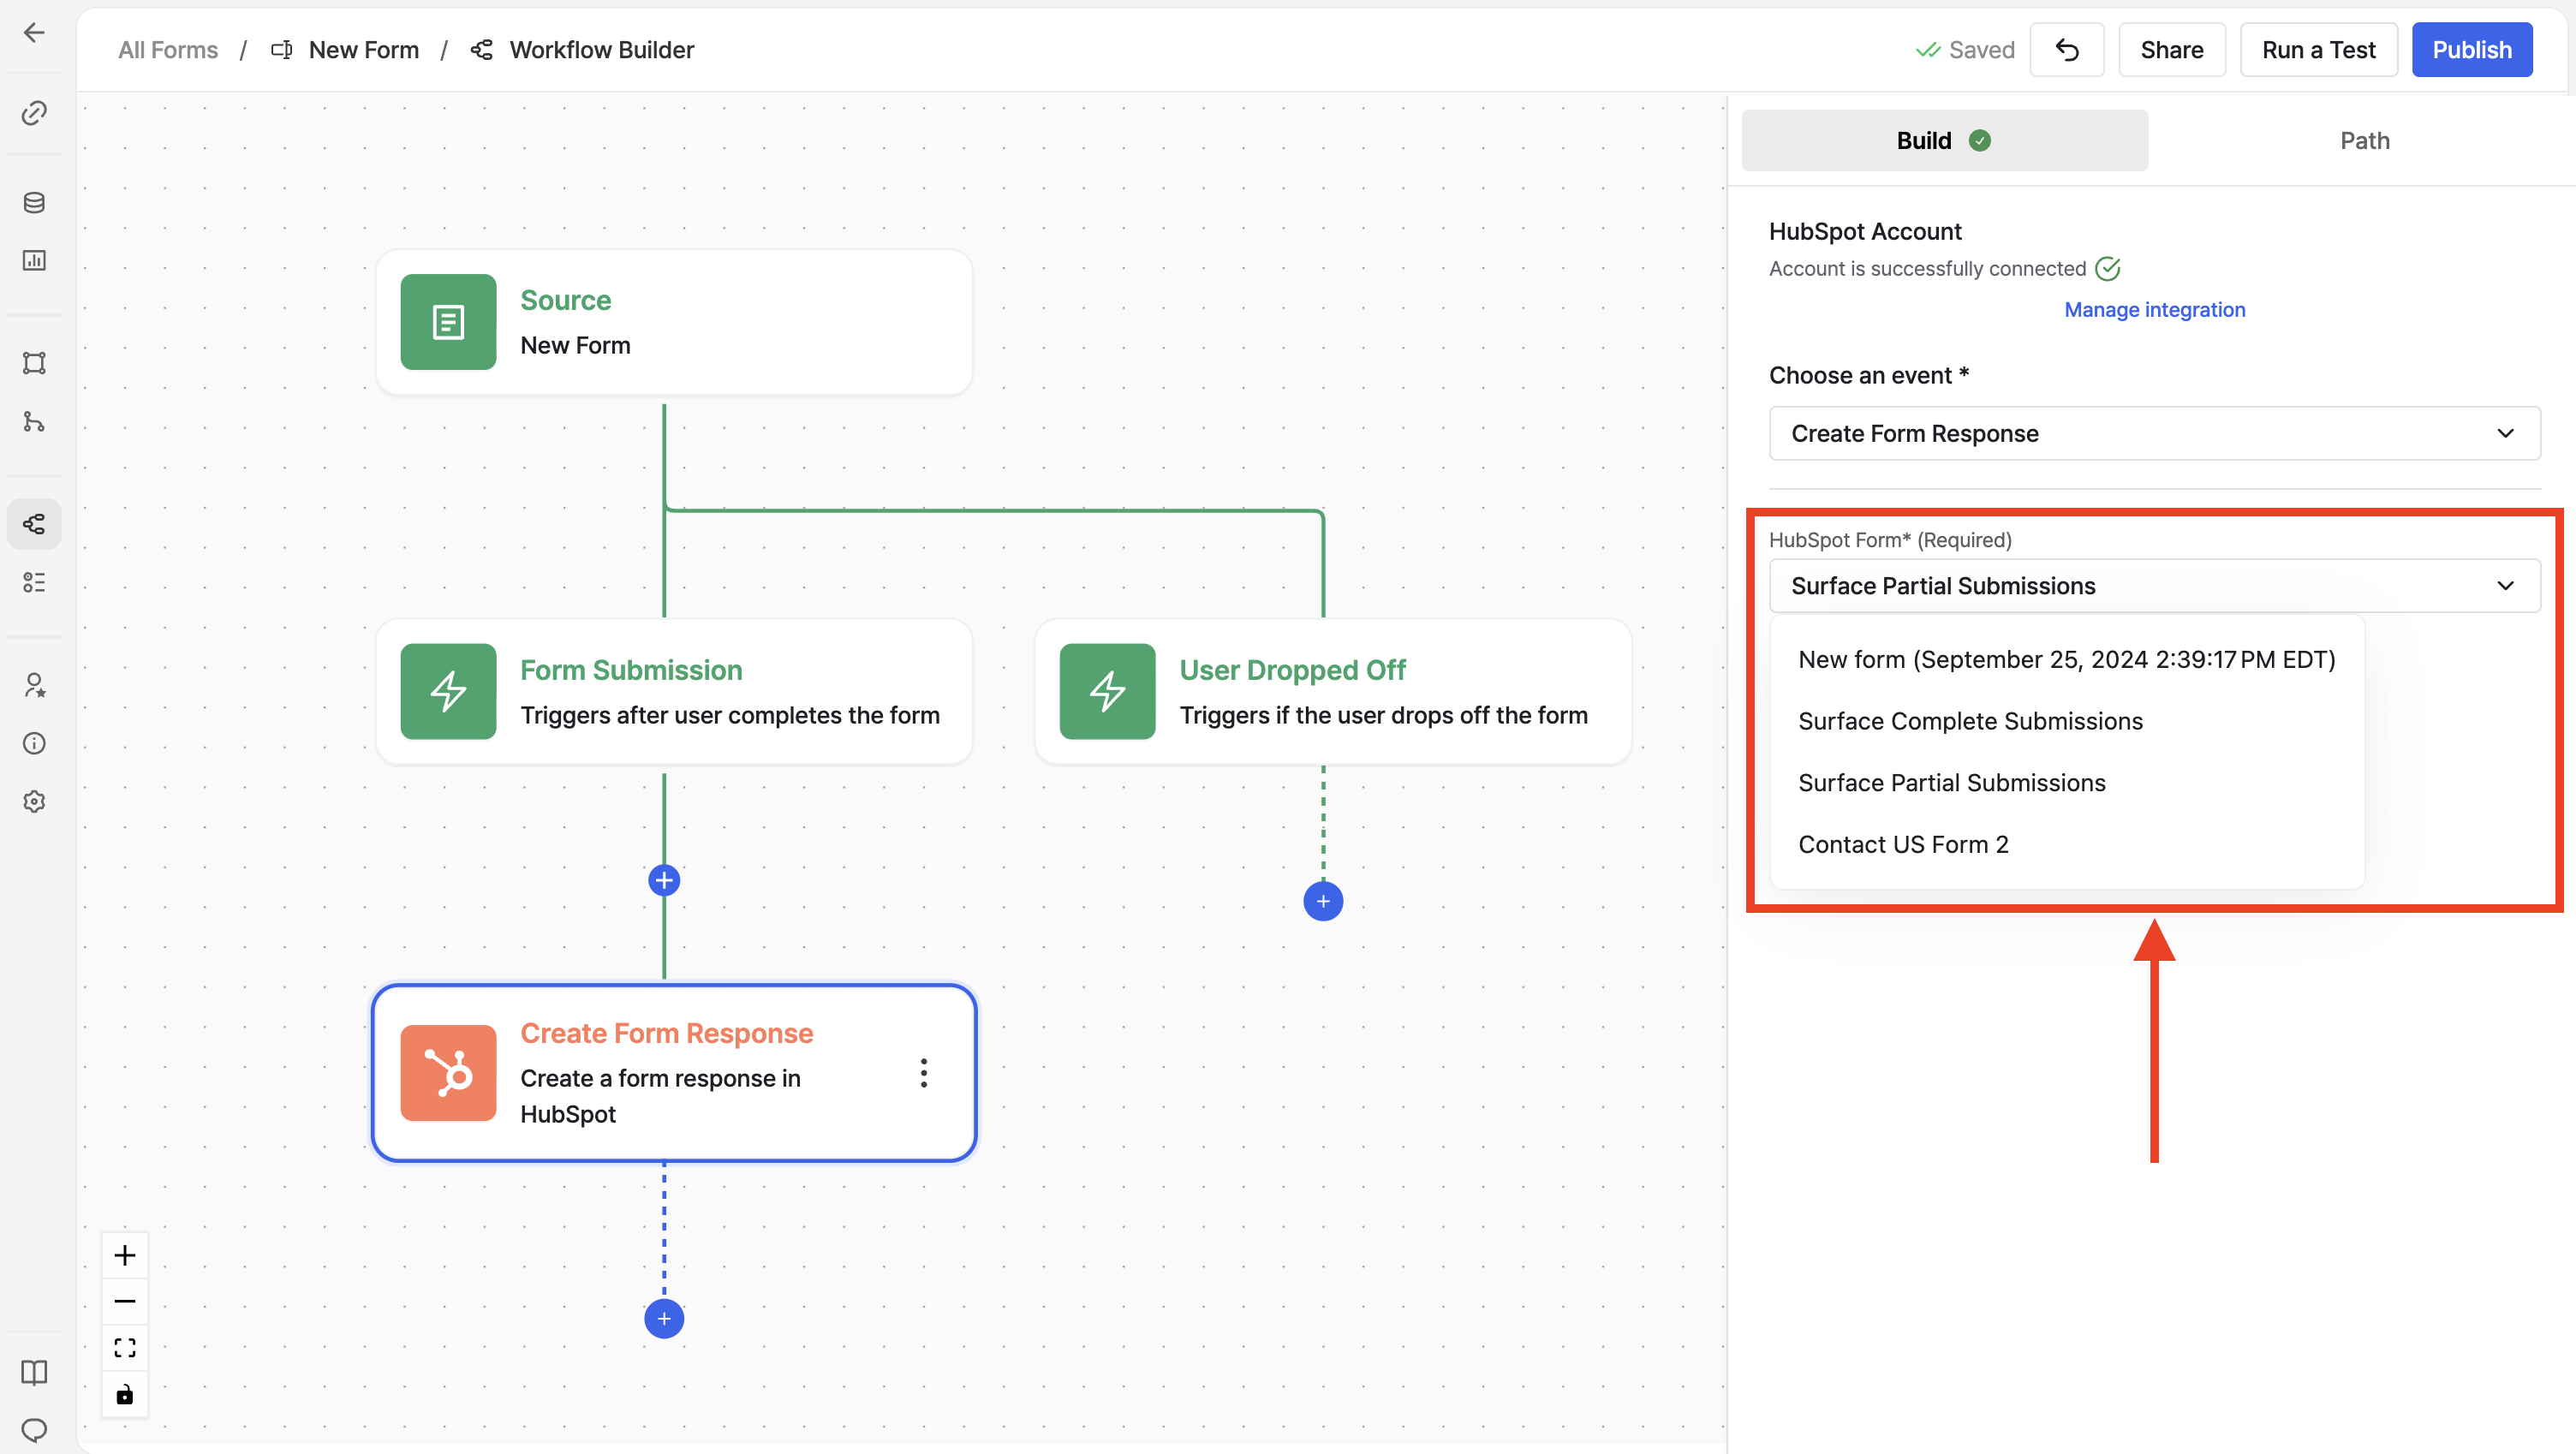 1. Click on the **HubSpot Form** dropdown
2. Select the **same form** you created in [Step 1](https://www.withsurface.com/docs/guides/email-sequences-hubspot/step-1-hubspot-form) and used in your [Step 4](https://www.withsurface.com/docs/guides/email-sequences-hubspot/step-4-automation) automation
This form must match the one in your HubSpot automation so that submissions from Surface trigger enrollment in your sequence.
### Get Internal Names from HubSpot Form Fields [#get-internal-names-from-hubspot-form-fields]
You need the **internal names** (API names) of your HubSpot form fields. These are what you enter as the **Value** when mapping in Surface.
1. Click on the **HubSpot Form** dropdown
2. Select the **same form** you created in [Step 1](https://www.withsurface.com/docs/guides/email-sequences-hubspot/step-1-hubspot-form) and used in your [Step 4](https://www.withsurface.com/docs/guides/email-sequences-hubspot/step-4-automation) automation
This form must match the one in your HubSpot automation so that submissions from Surface trigger enrollment in your sequence.
### Get Internal Names from HubSpot Form Fields [#get-internal-names-from-hubspot-form-fields]
You need the **internal names** (API names) of your HubSpot form fields. These are what you enter as the **Value** when mapping in Surface.
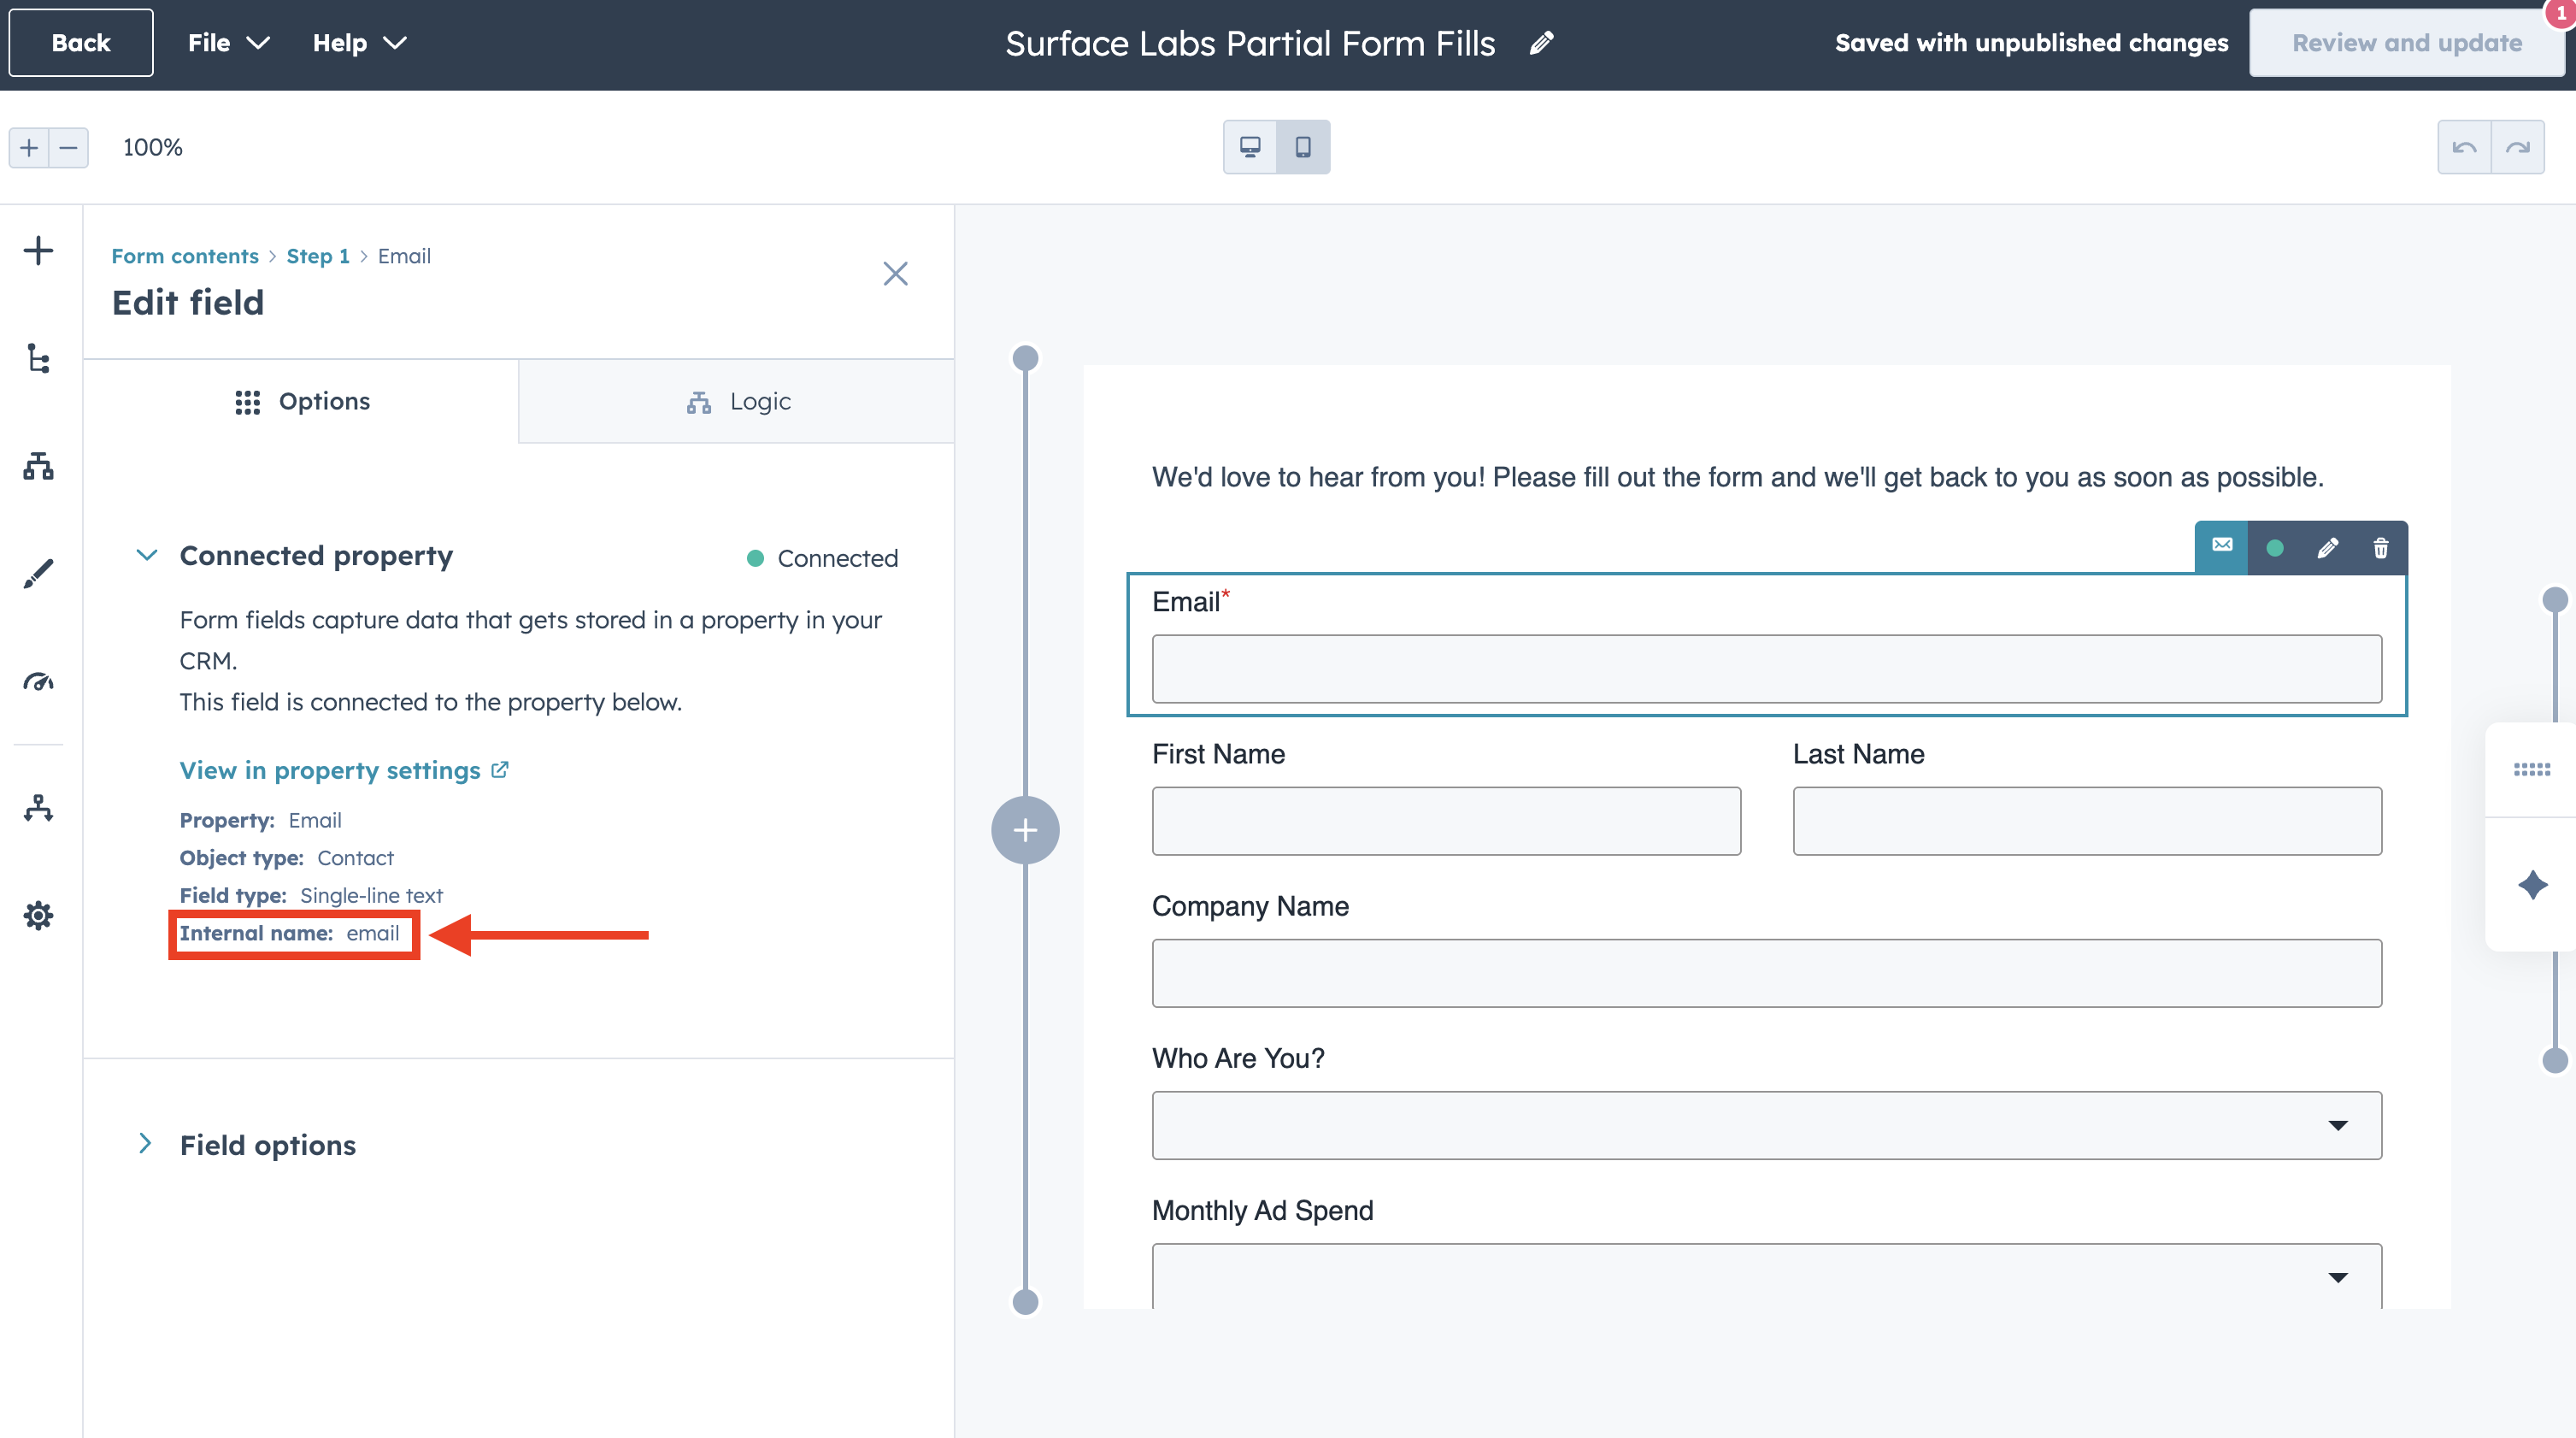 To find the internal name for each HubSpot form field:
1. In your HubSpot form editor, **select the field** (e.g., Email or First Name)
2. In the **Edit field** panel on the left, click **Connected property** (shown as "Connected" with a green indicator)
3. Under the Connected property section, note the **Internal name** (e.g., `email`, `firstname`)
The internal name is different from the field label. Always use the exact internal name from the Connected property section when mapping in Surface.
### Map Surface Form Fields to HubSpot Form Fields [#map-surface-form-fields-to-hubspot-form-fields]
To find the internal name for each HubSpot form field:
1. In your HubSpot form editor, **select the field** (e.g., Email or First Name)
2. In the **Edit field** panel on the left, click **Connected property** (shown as "Connected" with a green indicator)
3. Under the Connected property section, note the **Internal name** (e.g., `email`, `firstname`)
The internal name is different from the field label. Always use the exact internal name from the Connected property section when mapping in Surface.
### Map Surface Form Fields to HubSpot Form Fields [#map-surface-form-fields-to-hubspot-form-fields]
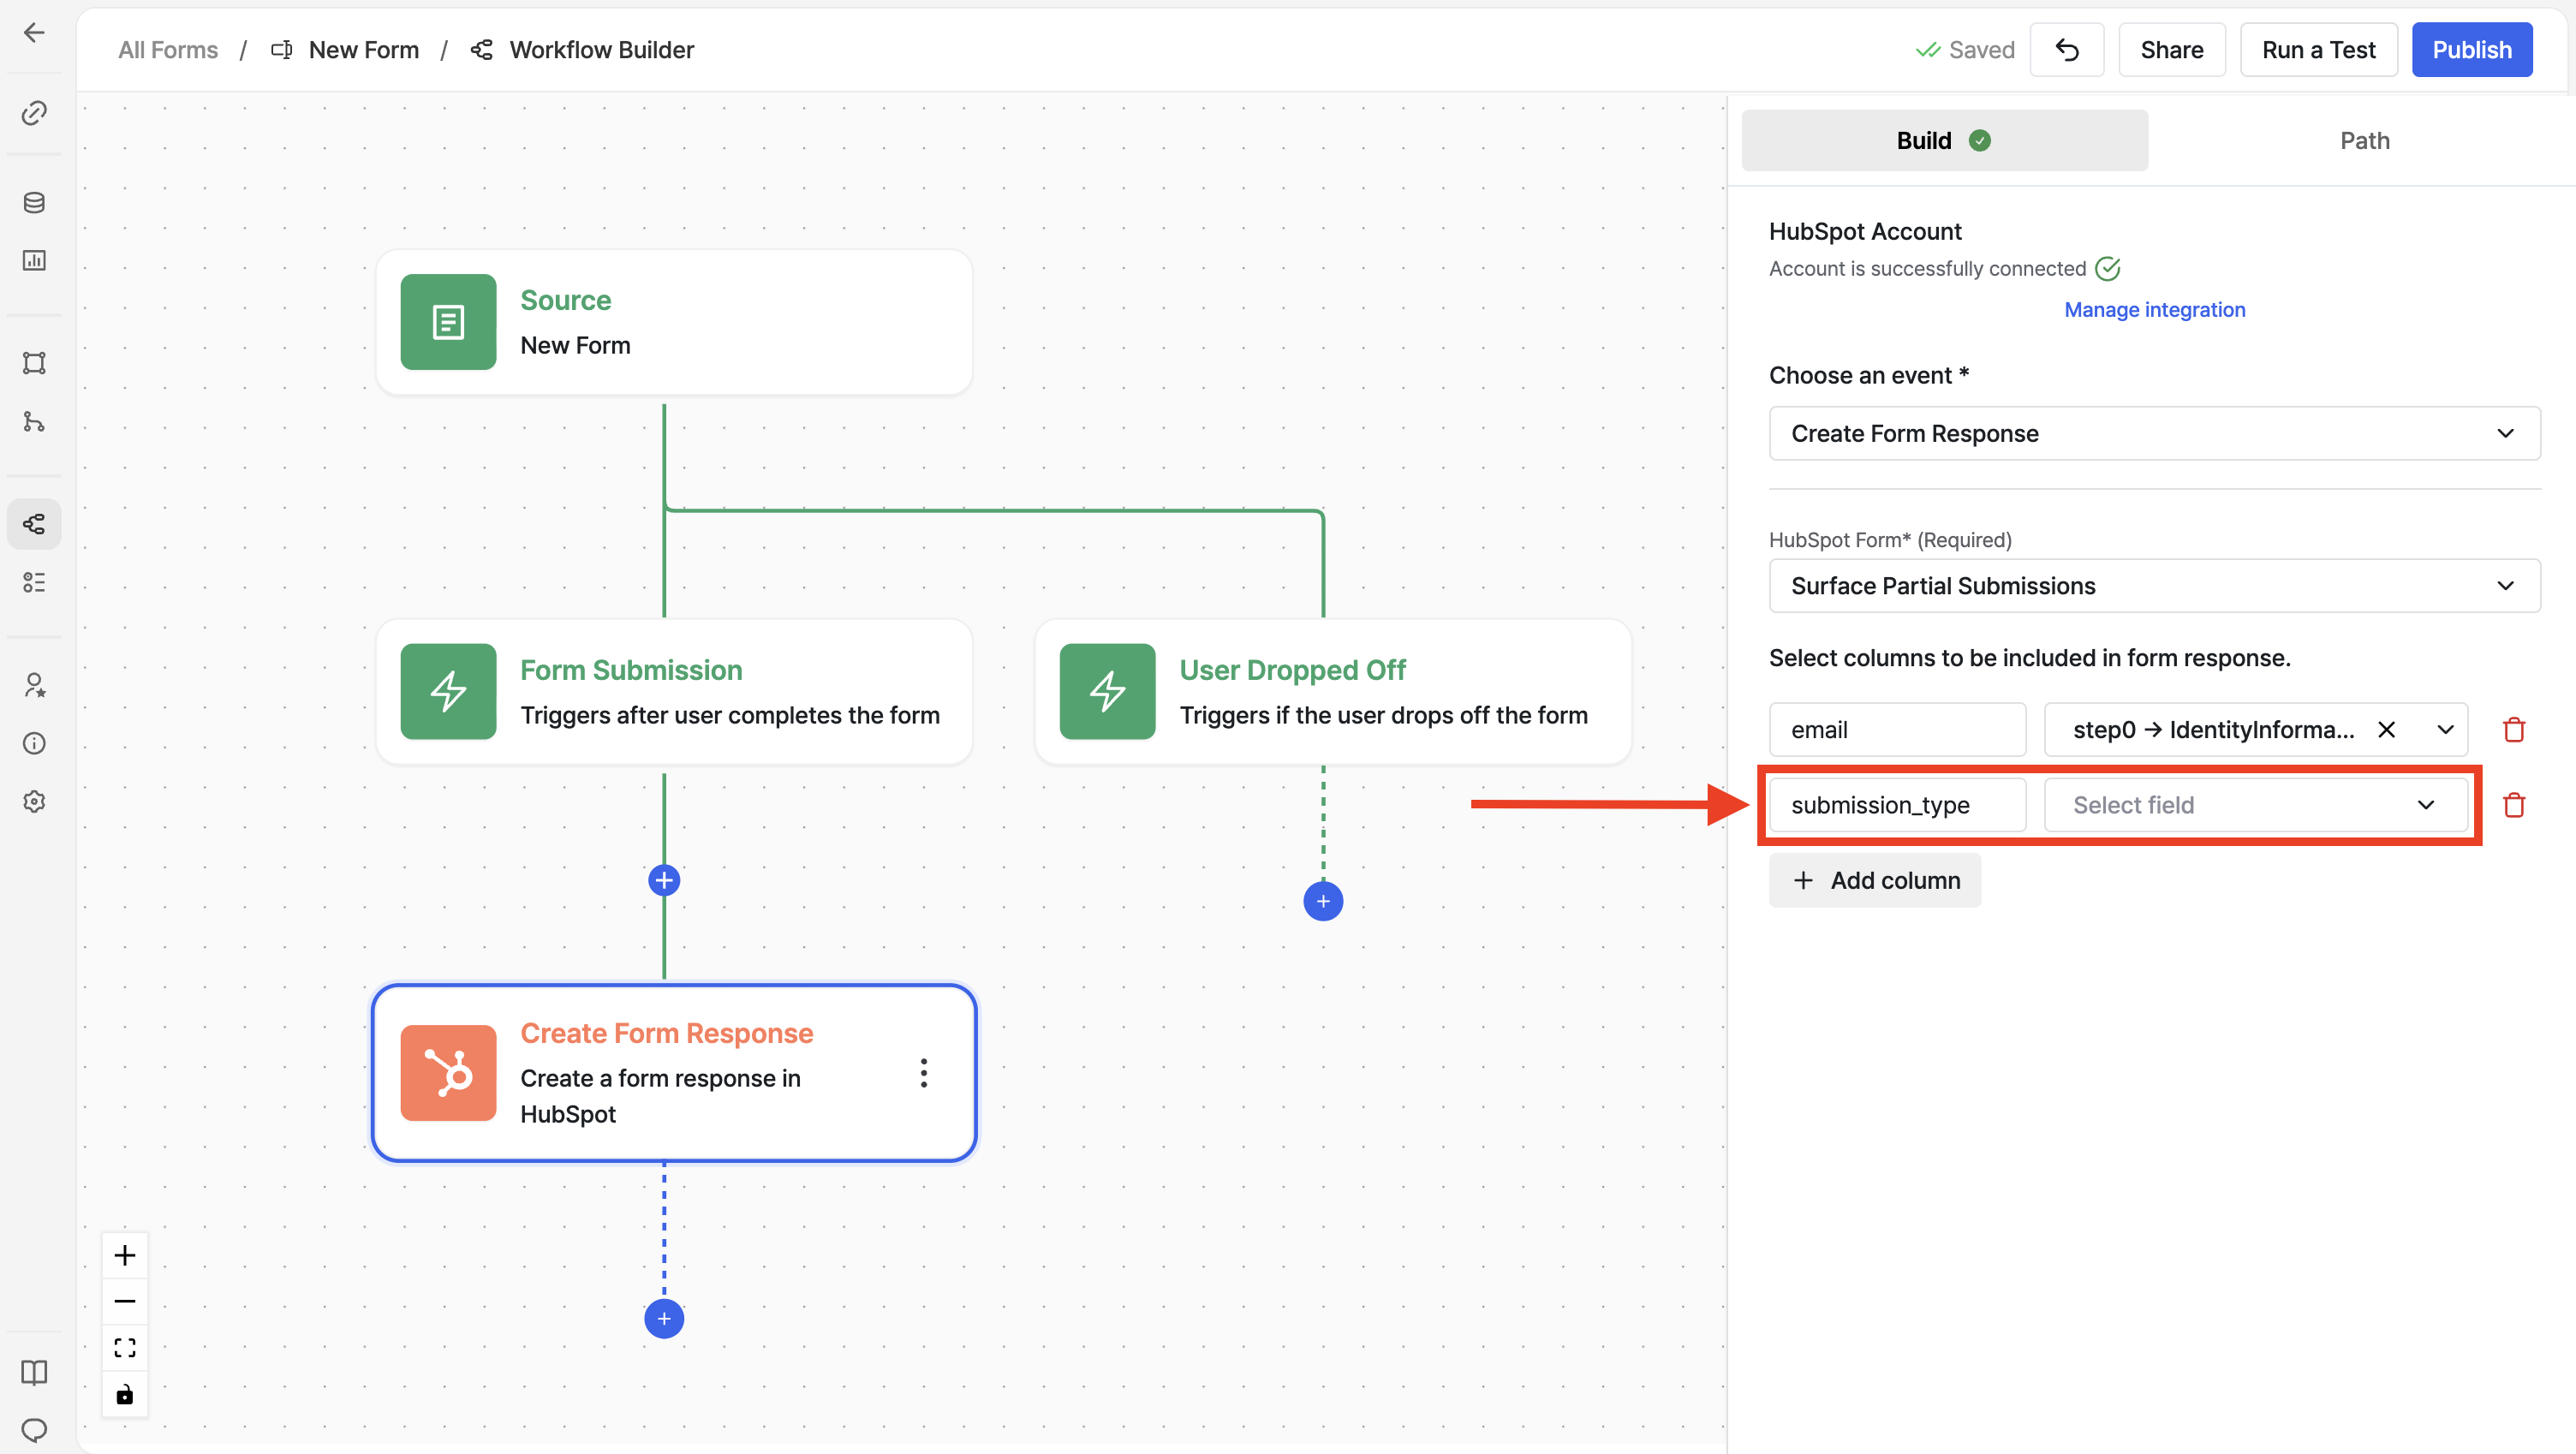 Map your Surface form fields to the HubSpot form so contact data (and sequence personalization) is correct:
1. Click **Add column** to add a new field mapping
2. **Key (Surface Field)**: Select the field from your Surface form (e.g., from Form Submission or Lead)
* Example: `email`, `firstName`, `lastName`
3. **Value (HubSpot Internal Name)**: Enter the exact internal name from HubSpot
* Example: `email`, `firstname`, `lastname`
4. **HubSpot Field**: Select the corresponding HubSpot form field from the dropdown (e.g., Email, First name, Last name)
**Mapping examples:**
| Surface Field (Key) | HubSpot Internal Name (Value) | HubSpot Field |
| ----------------------------- | ----------------------------- | ------------- |
| `email` (Form Submission) | `email` | Email |
| `firstName` (Form Submission) | `firstname` | First Name |
| `lastName` (Form Submission) | `lastname` | Last Name |
The **Value** must match the HubSpot internal name exactly (case-sensitive). This ensures data flows into the right contact properties and your sequence personalization tokens work.
## Save and Activate [#save-and-activate]
1. Save the workflow
2. Activate it so it runs when leads submit or drop off your Surface form
## Next Steps [#next-steps]
* For optional HubSpot actions (Create Contact, Create Deal, and the rest), see [Configure HubSpot in Surface Workflow](https://www.withsurface.com/docs/guides/hubspot-forms/configure-workflow#configure-additional-hubspot-actions-optional)
* Back to the [Email Sequences with HubSpot overview](https://www.withsurface.com/docs/guides/email-sequences-hubspot/overview)
Map your Surface form fields to the HubSpot form so contact data (and sequence personalization) is correct:
1. Click **Add column** to add a new field mapping
2. **Key (Surface Field)**: Select the field from your Surface form (e.g., from Form Submission or Lead)
* Example: `email`, `firstName`, `lastName`
3. **Value (HubSpot Internal Name)**: Enter the exact internal name from HubSpot
* Example: `email`, `firstname`, `lastname`
4. **HubSpot Field**: Select the corresponding HubSpot form field from the dropdown (e.g., Email, First name, Last name)
**Mapping examples:**
| Surface Field (Key) | HubSpot Internal Name (Value) | HubSpot Field |
| ----------------------------- | ----------------------------- | ------------- |
| `email` (Form Submission) | `email` | Email |
| `firstName` (Form Submission) | `firstname` | First Name |
| `lastName` (Form Submission) | `lastname` | Last Name |
The **Value** must match the HubSpot internal name exactly (case-sensitive). This ensures data flows into the right contact properties and your sequence personalization tokens work.
## Save and Activate [#save-and-activate]
1. Save the workflow
2. Activate it so it runs when leads submit or drop off your Surface form
## Next Steps [#next-steps]
* For optional HubSpot actions (Create Contact, Create Deal, and the rest), see [Configure HubSpot in Surface Workflow](https://www.withsurface.com/docs/guides/hubspot-forms/configure-workflow#configure-additional-hubspot-actions-optional)
* Back to the [Email Sequences with HubSpot overview](https://www.withsurface.com/docs/guides/email-sequences-hubspot/overview)